(Since writing this post, we also used it as a basis for webinar. You can view a demonstration of the steps written below by watching our How to Create Custom Safety Training webinar, or simply read on if you prefer reading.)
For many companies with safety training needs, off-the-shelf e-learning courses like the ones we make here at Convergence Training are a great option. They provide affordable access to quality training on common safety topics. However, every work environment is different, with unique health and safety hazards, and one-size-fits-all training can’t meet 100% of your EHS needs 100% of the time.
If you rely on a learning management system to help you deliver your training, it can help to have some experience creating your own e-learning courses. There are some really simple tools out there that let you create your own, complete with interactivity and quizzes, to help you fill in any gaps in your EHS training library.
In this post, we’ll show you how you can create safety training with an e-learning authoring tool called Articulate Studio. When we’re done, you will have made an e-learning course that teaches crane operators to identify crane hand signals. The course will include a simple interactive slide show and a quiz. And then you can apply the process to create safety training materials of your own on any topic you wish.
- Learning Management Systems
- Online Safety and Health Training Courses
- Incident Management Software
- Mobile Safety Training Apps
What Tools Do You Need to Create Your Own Safety Training e-Learning Courses?
So, first, what do you need to do this? Not much:
1. Microsoft PowerPoint (actually, you could get away without using this, but it is a handy place to start, and you’re probably already familiar with it)
2. An e-learning authoring tool such as Articulate Studio ’13 (there are other e-learning authoring tools out there–today we’ve chosen to demonstrate Articulate Studio, but we’ll highlight others in future posts)
3. A simple graphics editing tool (I’m using Paint.net–it’s a free download, it’s more powerful than the Paint application that comes with Windows, and it’s not as complicated as Photoshop, so that kind of hits a “sweet spot” for me)
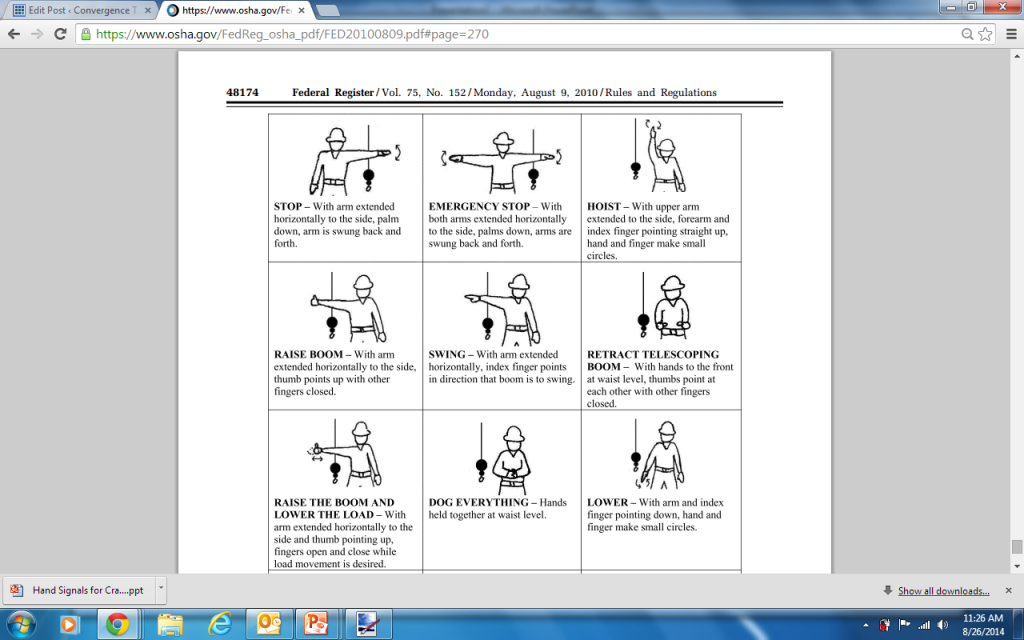
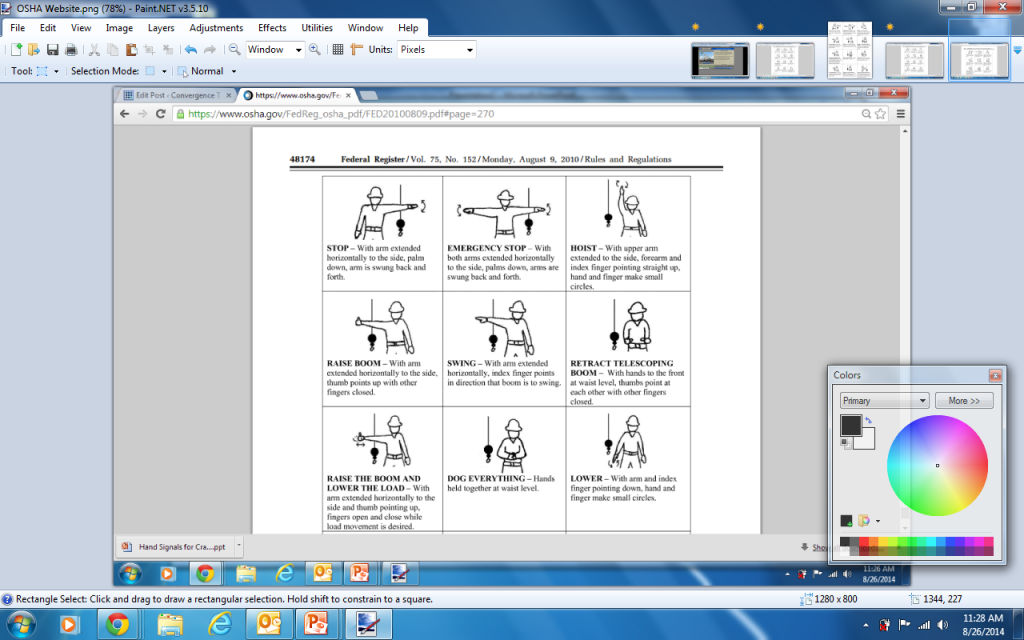
4. A web browser and Internet connection so that you can access OSHA’s website (that’s because we’re going to use drawings of the crane hand signals that are available in Appendix A to Subpart CC of Part 1926)
A few quick notes about using the drawings of hand crane signals in OSHA’s standard: These drawings are public domain, which is why it’s OK to use them for something you don’t plan on selling. Still, it’s a good idea to credit OSHA within the e-learning course, and we will do that. Always respect the copy-written materials of others, and when in doubt, purchase or create your own materials).
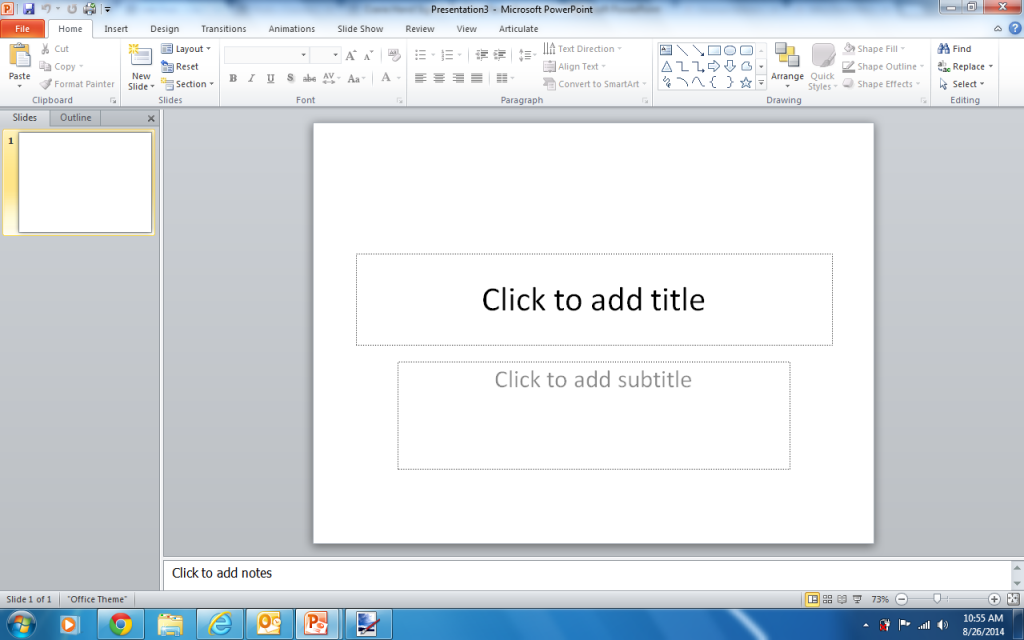
Start With Your PowerPoint Safety Training Presentation
I know we said we were going to create safety training with Articulate, but a great place to begin is with your PowerPoint presentation. We’ll assume you’re beginning from scratch, so it will look like this (below).
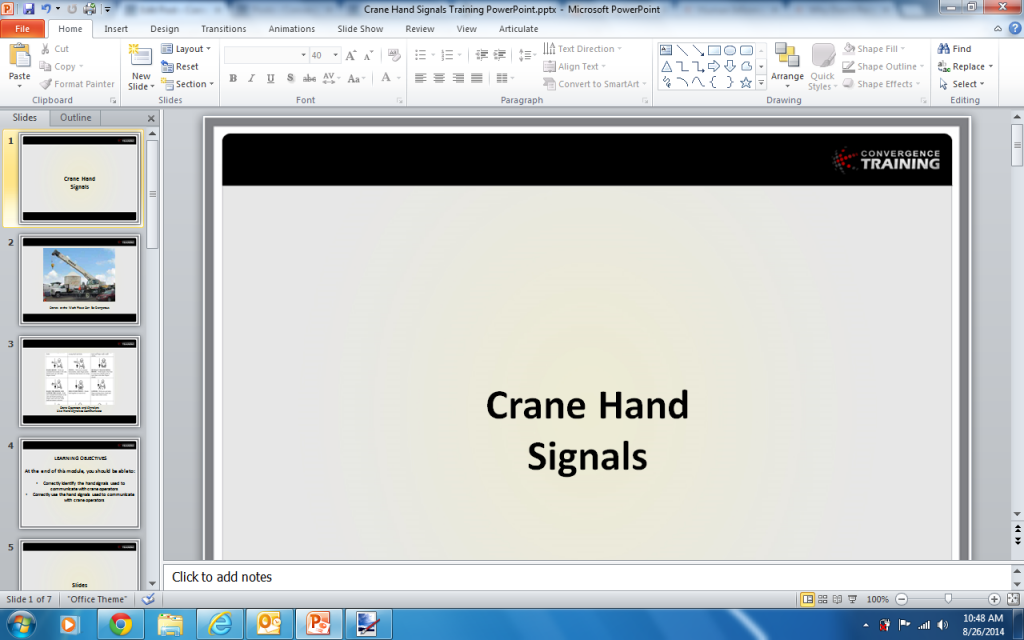
Next, construct a few simple PowerPoint slides to introduce the topic. You’ll add slides to this presentation later, when you’re working with Articulate Studio. In this case, we’ll begin by adding the following slides:
1. A Course Title slide
2. Two “introductory” slides to talk about cranes at the work site and crane hand signals
3. A Learning Objectives slide
4. A slide to introduce the screen that we’ll later create with Articulate Studio (which will allow the workers to view the various crane hand signals in an interactive, self-guided format)
5. A slide to introduce the screen that we’ll later create with Articulate Studio (which will quiz the workers on those same crane hand signals and give feedback to correct or incorrect answers)
6. A Summary slide
Your own e-learning course may be longer than this, but we’re just trying to introduce you to a few of the basic concepts. Besides, there’s nothing wrong with brevity when it comes to training–did you know the average person can only keep 2-4 “things” in their working memory at any one time? It’s true–read more about that here.
Once we’re done creating those slides, our PowerPoint presentation will look like this:
Next, Get Your Crane Hand Signal Images Ready
Now that you’ve got the “base” PowerPoint ready, it’s a good time to get your images of the various crane hand signals copied from the OSHA website and saved on your computer. Here’s the basic process:
1. Find the webpage at OSHA.gov that includes the drawings of the various crane hand signals. Here’s the link to Appendix A to Subpart CC of Part 1926.
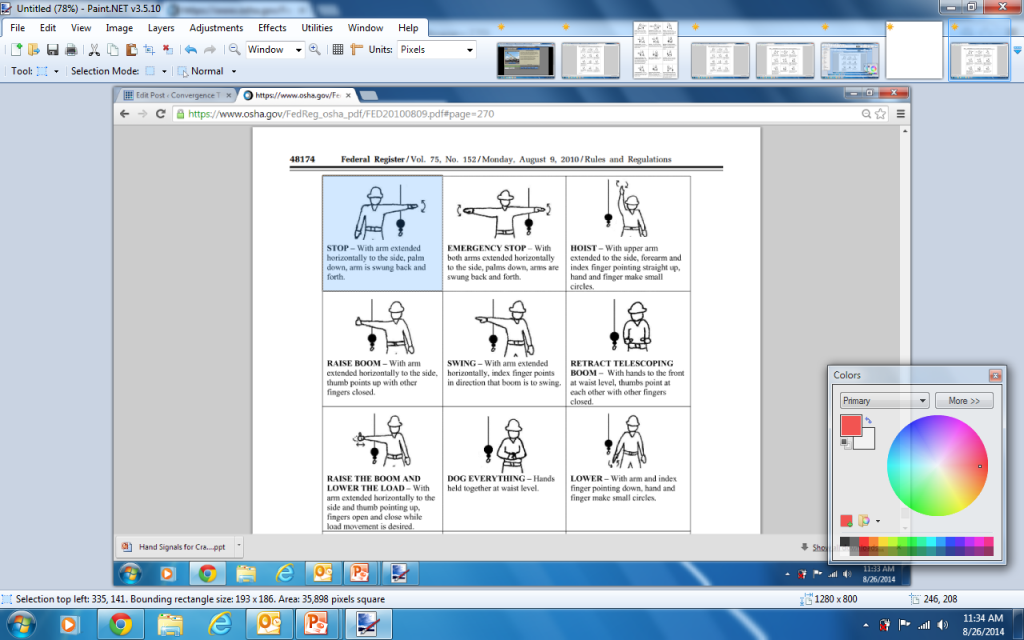
2. Open your image-editing software (in my case, Paint.net).
3. Copy a screen grab of the entire OSHA webpage with all the hand signal images. This works differently on different computers. In my case, I hold the Fn button and the F11 button down at the same time to do this.
4. Crop the screen grab around each individual hand signal and save each image to your computer (there are nineteen hand signals on the website, so you’ll wind up saving nineteen individual images to your computer)
Below are some screen grabs to show you how that process works.
Go to the OSHA website and take a screen grab of all the images (or maybe several screen grabs–however many it takes).
After you’ve got your screen grab, paste it (Ctrl-V on your keyboard) into an image editing software application like Paint, Paint.net, PhotoShop, or something similar.
Then, pick the “Select” tool so you can select just one of the hand signal images.

Select the first hand signal, copy it to create a new image, and save that image. Repeat this process until you’ve created an image for every hand signal.
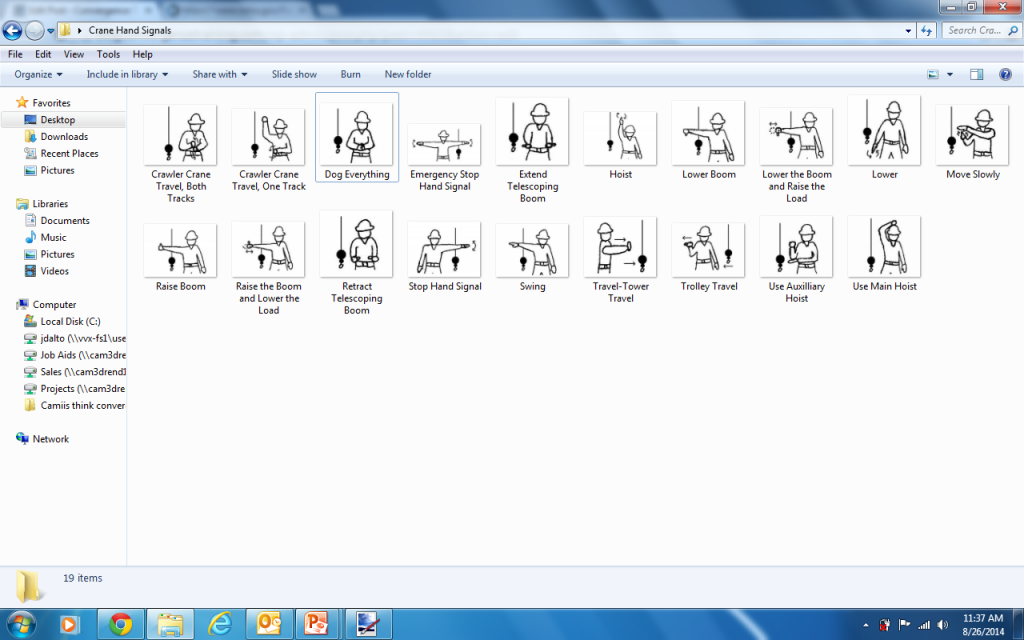
Save those images into a single folder like we did below so it will be easier to find and work with them later. Also, note that we named them by the meaning of the signal–this helps a lot.
Next, Get a Copy of Articulate Studio ’13
So your next step is to take that PowerPoint presentation and your hand signal images and begin working with Articulate Studio ’13 to turn them into your own safety training e-learning course.
Of course, that would begin with going to the Articulate website where you can get Studio ’13. Here’s a tip: they’ve got a free 30-day download so you can check their product out before you have to pay.
Once you’ve downloaded Articulate Studio, you’ll see you actually get four different components:
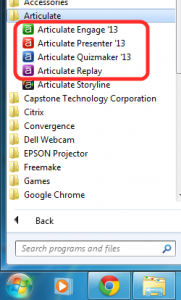
We’ll use Presenter, Engage, and Quizmaker in our example.
Then, Open Articulate Presenter
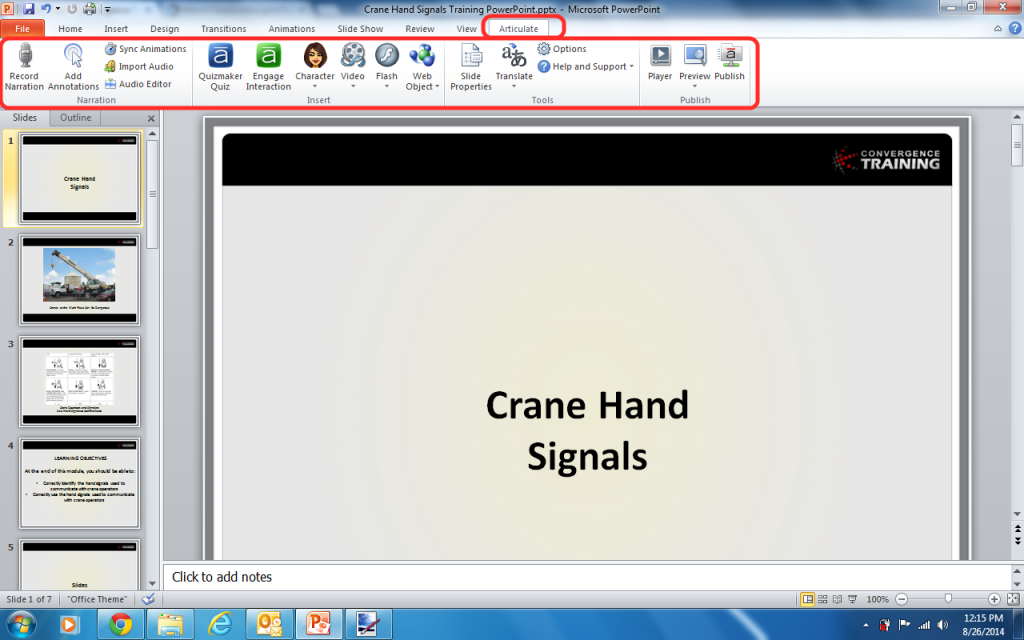
OK, so now it’s time to open Articulate Presenter. The nice thing is that, once you’ve downloaded and installed Articulate Studio ’13, opening Presenter is easy–it’s right there in PowerPoint as a new menu on the right with its own “ribbon” directly underneath (see below).
Add Some Audio to Your Screens
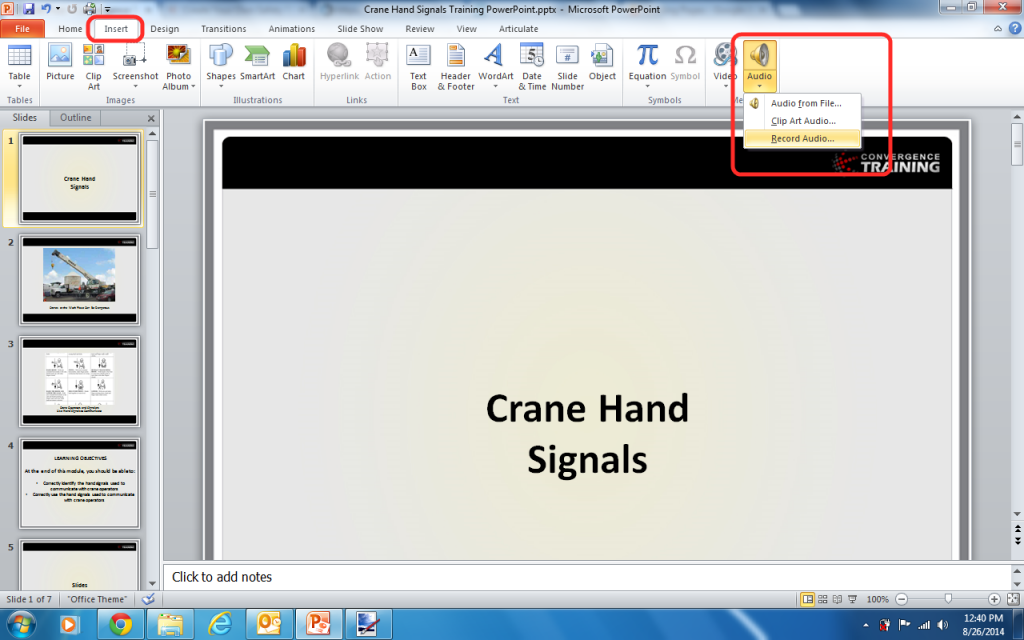
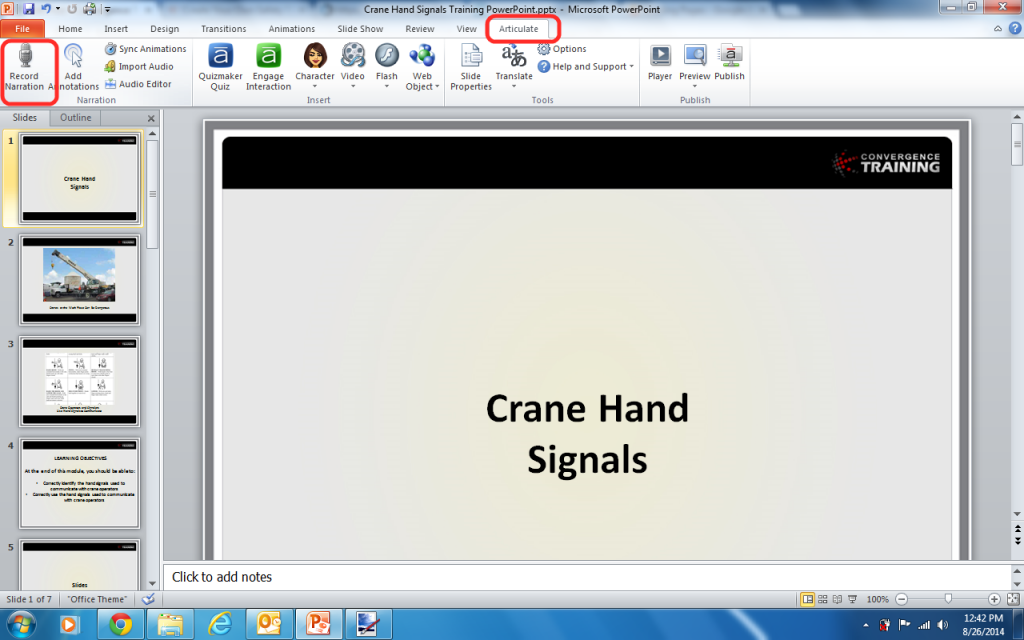
I’m going to add a little audio to a few of the slides. You can do this directly or in PowerPoint or in the Articulate menu within PowerPoint. I like to do it in Articulate, but the images below show you where to do it in each.
Here’s where you add the audio in PowerPoint:
And here’s where you add the audio in Articulate:
Once you’ve click the Record Narration button in Articulate, you’ll get some easy-to-use controls for recording and saving audio that look like this (below):
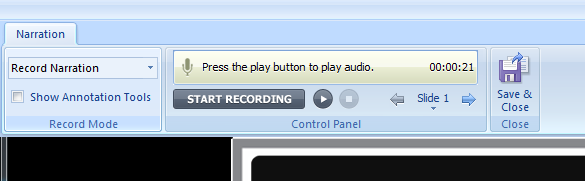
I’m not going to go into great detail about how to record your audio narration for two reasons:
1. The controls are pretty self-explanatory.
2. Articulate has a ton of helpful explanations of how to use their product on their website–check out their stuff on adding and editing audio.
BUT, I will say something about your microphone. You CAN record the audio with the microphone that’s built into your computer. If you can afford to, try to bump that up a bit though. For as little as $15-25, you can go to one of those office-supply stores and pick up a simple microphone that plugs into your computer. You should notice an improvement in your audio quality. Or, if you can pony up just a little more money, I bought and am quite happy with the “Snowball” microphone from a company called Blue (that link you just passed takes you to the page on Amazon.com). It plugs into your computer’s USB port, set me back only about $45, and I’m quite happy with it.
(Note: There are probably lots of other great microphones out there too. Get whatever works for you–I’m not trying to sell you a microphone. Also, don’t sweat the sound quality too much.)
Now, Create an Interactive “Slide Show” to Teach Your Employees the Crane Hand Signals
Our goal is to teach the hand signals to our workers and then quiz then to see if they know the hand signals.
So, in this step, we’re going to use Articulate Engage (one of the four components that make up Articulate Studio) to create a little interactive “slide-deck” to introduce workers to the different signals.
When we’re done, the workers will be able to scroll through all the images and move through them like a slide show, seeing each one in a larger version with its name and a description of the physical motion (as you’ll see in just a bit).
Before we demonstrate this, though, let’s talk a little more about Engage. Engage lets you create interactive “widgets” that the folks at Articulate call simply “Interactions.” Each Interaction begins with pre-programmed multimedia interactions that have no training content in them. What you do is add your own content to the pre-programmed interaction. And the end result is an interactive multimedia training object that your workers can view and interact with.
Engage comes with 20 of these pre-configured interaction that you can put your own training content into. The one we’re going to use is called Media Panel. Check out their website to learn more about the interactions you can make with Engage. Maybe at some point in the future, Convergence Training will create a separate little blog post demonstrating how to use each in a safety training context.
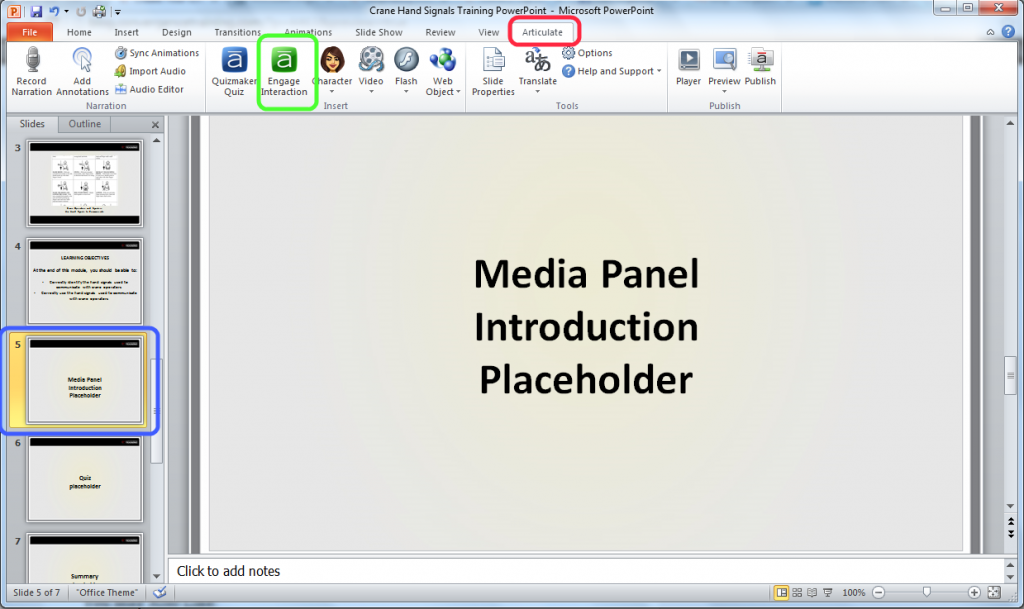
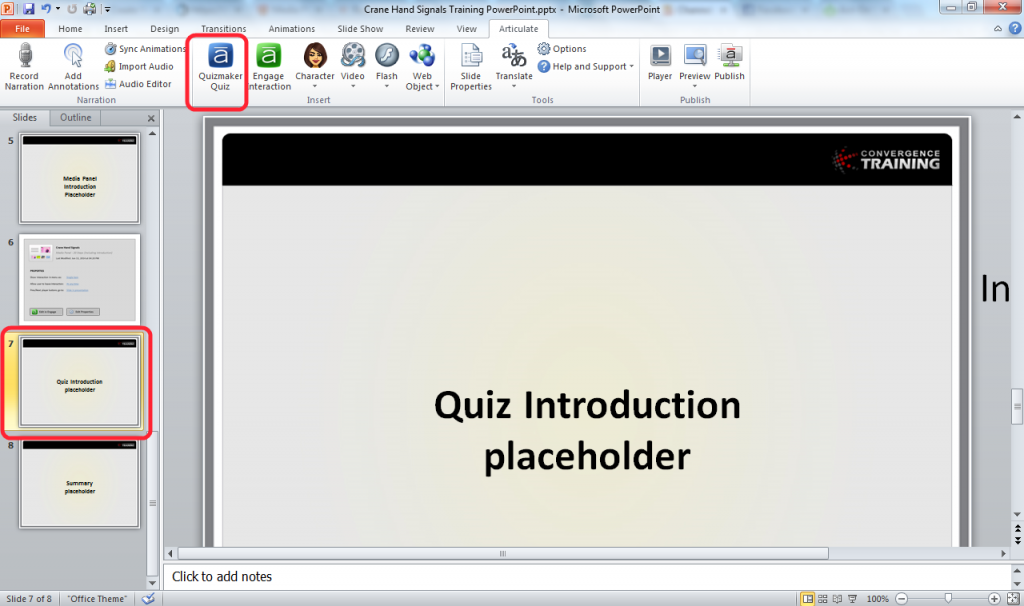
To begin, open that PowerPoint, open the Articulate menu (red circle, below), click on the screen that will appear immediately before the Engage Interaction (blue circle below), and then click the Engage button in the Articulate ribbon(green circle below).
A window will open asking if you want to add a new interaction or an existing interaction (one you had created previously). In this case, we’ll select “new.”

Engage will open up and will ask you to select the type of interaction you want to add. We had to scroll down a bit to find Media Player (hey, if your biggest problem is there are quite a few interactions to choose from, you’re doing alright).
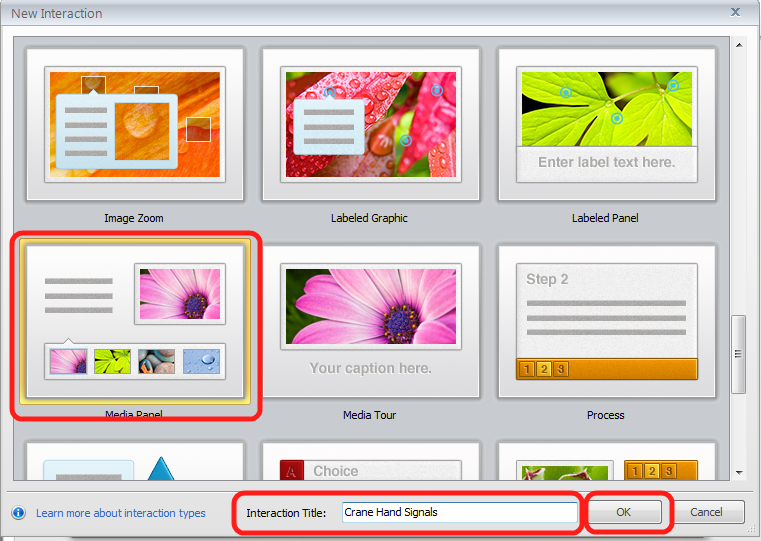
A new window will open. This is where you create the Media Player interaction that, when you’re done, will include an image of each Crane Hand Signal plus its name and a description.
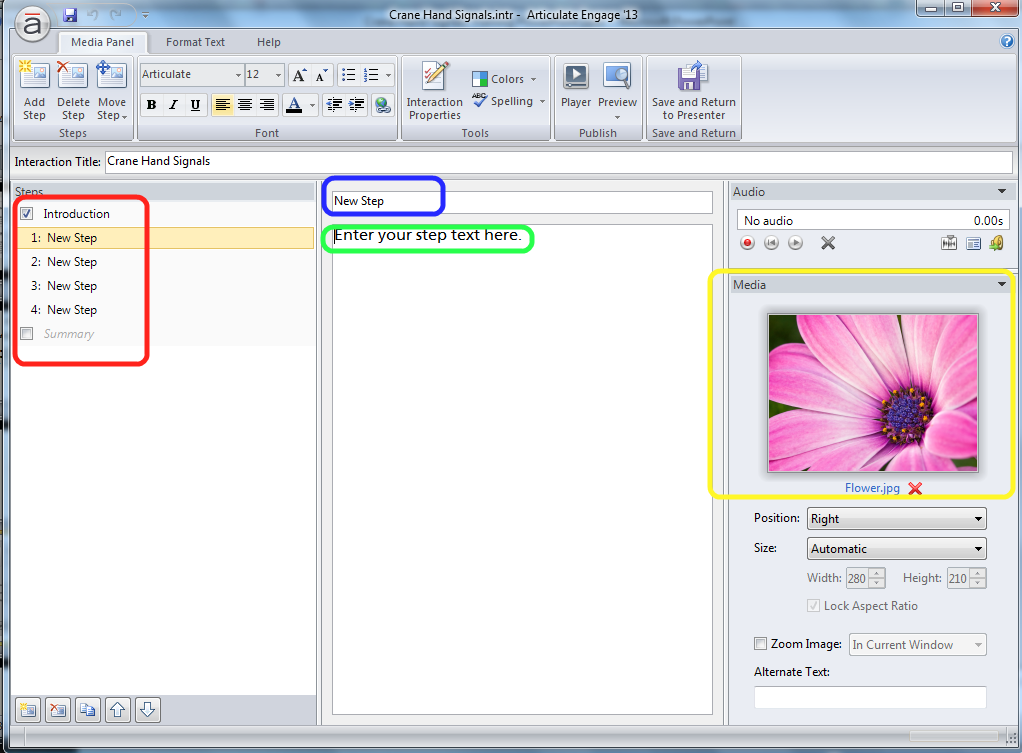
We’re not going to cover every single step here because Articulate does a nice job of doing that here, but we DO want to call out the basics:
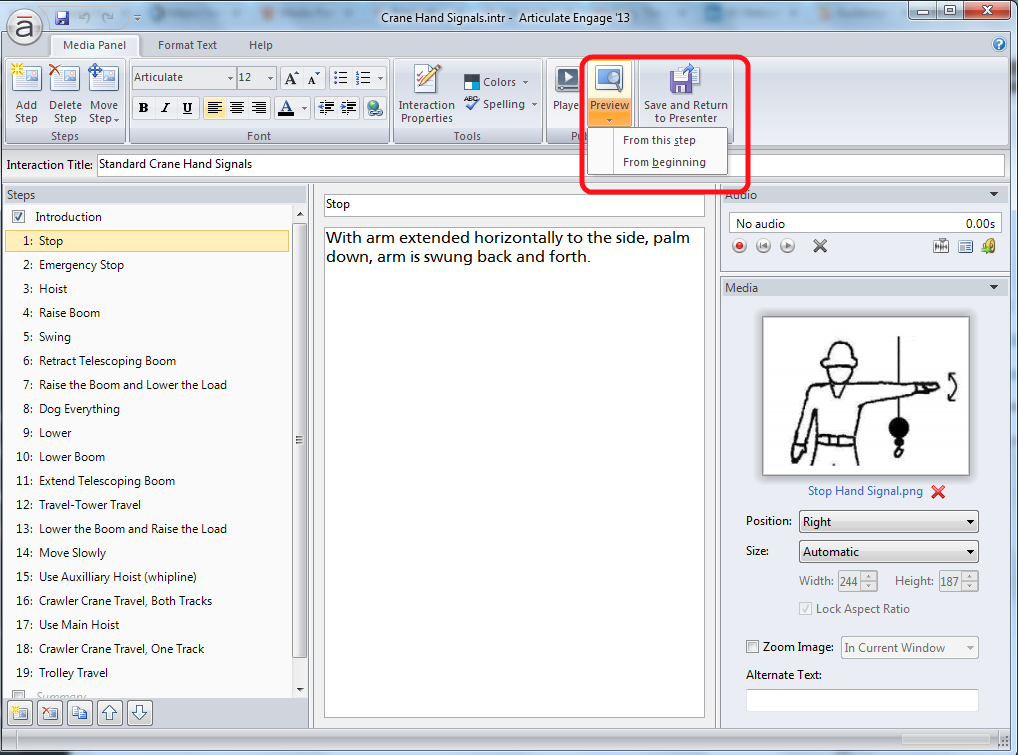
1. Each hand signal will be a Step. The red circle (below) shows four “starter” steps you’ll complete shortly. You can also add other steps.
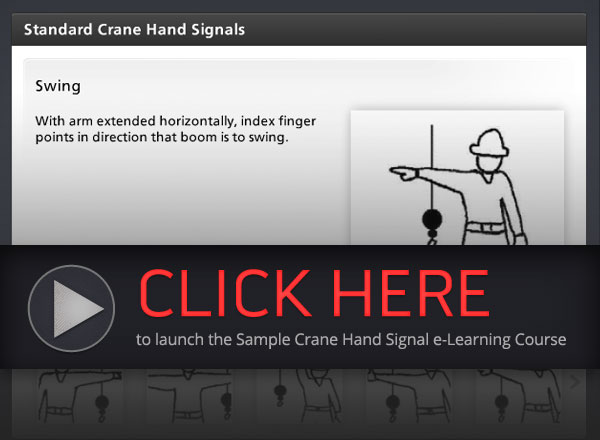
2. You will name each step where the blue circle is. For example, you’ll name one of the steps “Raise Boom.”
3. You will put in a description of the step where the green circle is. For example, under “Raise Boom,” you’ll write “With arm extended horizontally to the side, thumbs point up with other fingers closed.”
4. In the Media section (circled in yellow), replace the picture of the flower with a picture of the Raise Boom hand signal (remember, you copied these from the OSHA website and saved each hand signal as a separate image on your computer).
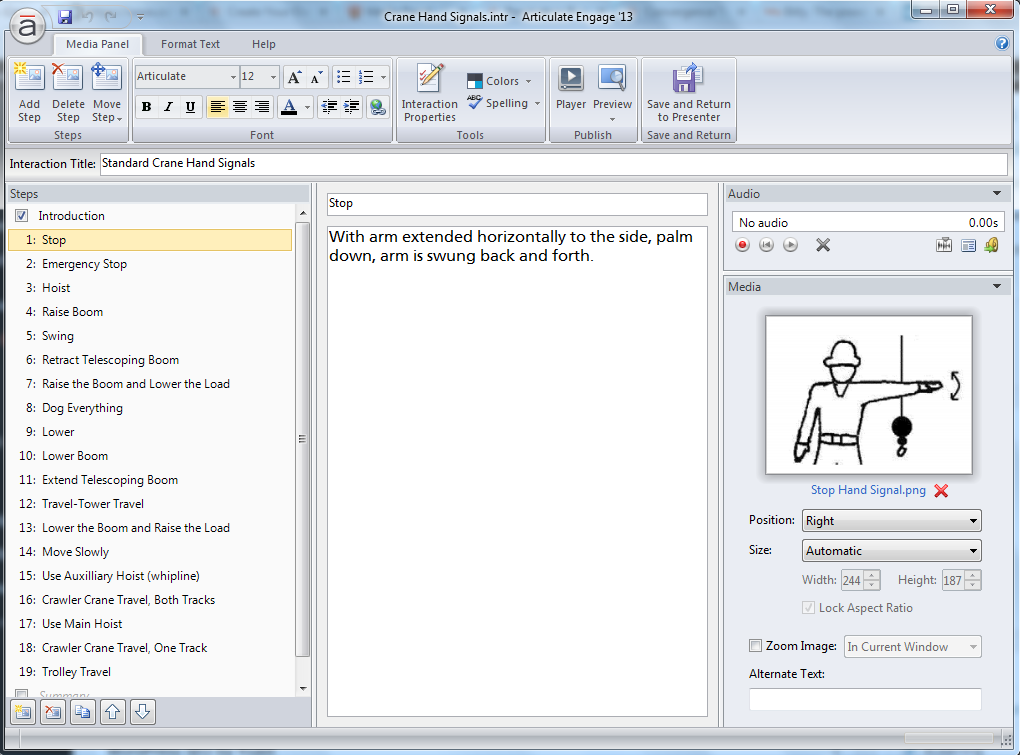
Create a Step for each of the crane hand signals. Rinse, lather, repeat.
Eventually, you’ll have something that looks like this (below).
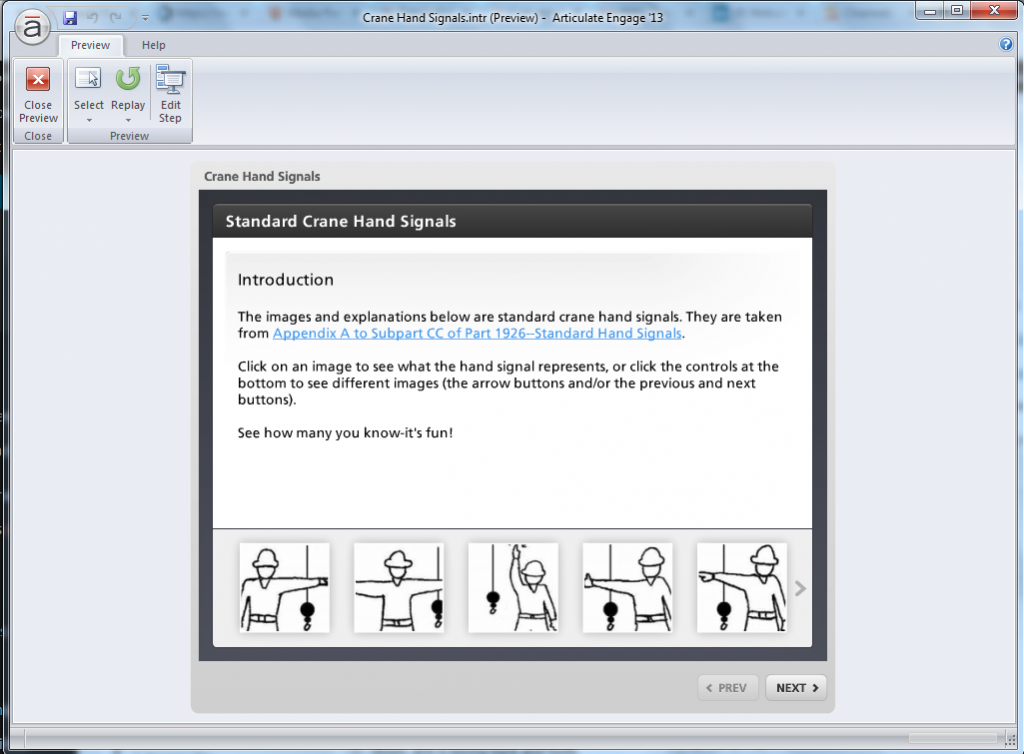
Before you close Engage and return to Presenter (where you’ll see your newly created Media Player interaction as one of the slides in your PowerPoint presentation), take a moment to preview the interaction.
This will give you a chance to see if you made any silly errors. We all slip up sometimes, right?
Here are the steps for previewing:
1. Under the “Preview” button, click the little downward-facing karat (sorry, I’d type one here but my keyboard doesn’t have one, so check out the picture below) and select “From beginning.”
2.Check it out.
And here’s what that looks like:
Click the Preview button.
Enjoy the fruits of your labor.
So by now you can probably see where this is going, huh? You’ll save and close this Interaction, you’ll see it in PowerPoint, you’ll create a Quiz and add that to your PowerPoint Presentation, you’ll save the whole thing, and then you’ll import this into a learning management system so you can assign it to your workers. Pretty cool, huh?
Don’t have a learning management system (LMS)? Check out the family of LMSs from Convergence Training.
But we’re getting ahead of ourselves. Let’s go back to the step-by-step thing.
Close the preview (there’s a close button, look up ^) to return to the normal view of Engage. Then, click the “Save and Return to Presenter” button. You will return to Presenter, and your newly created Engage Media Player Interaction will be represented by one of the slides in your Power Point presentation.
Again, here’s what that looks like:
Click Save and Return to Presenter.
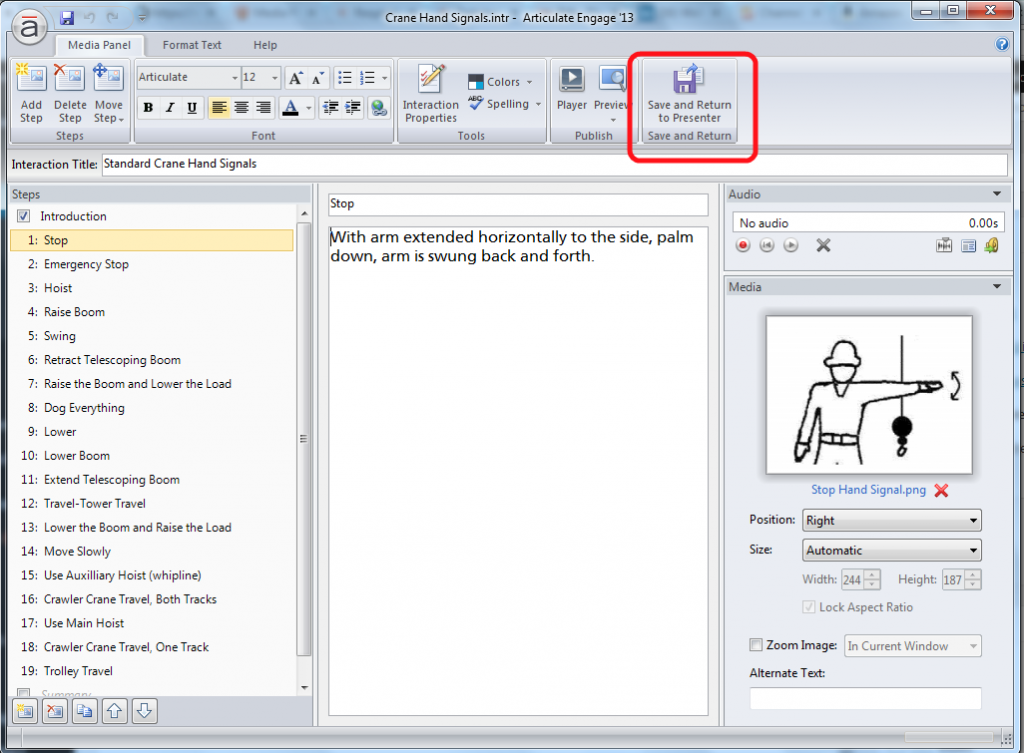
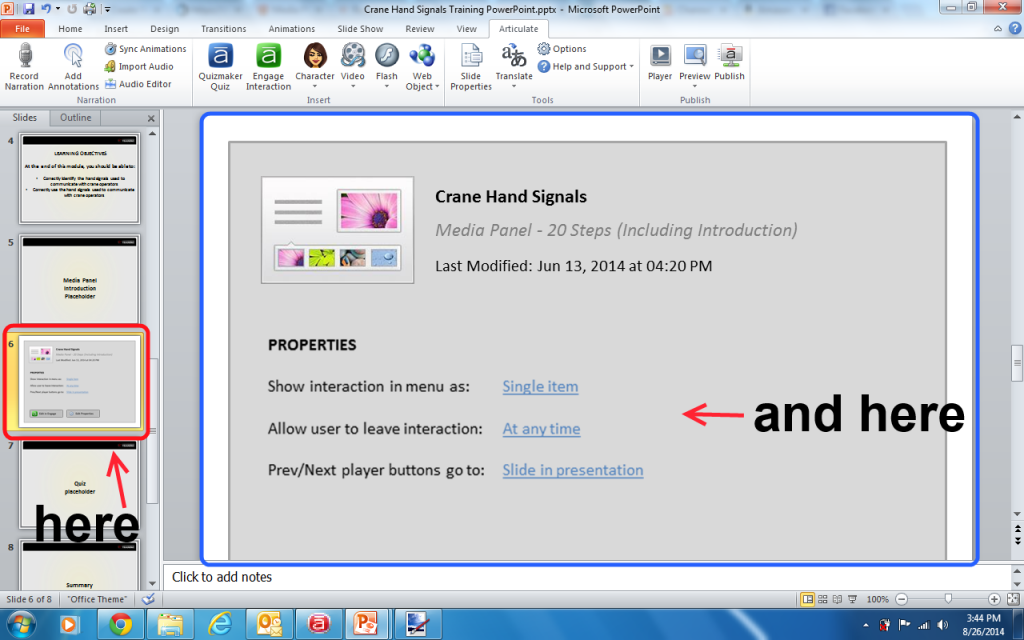
See your Interaction as a Slide in Your PowerPoint Presentation (that’s it represented in the “outline”view on the left (the red circle) and that’s it on the slide being displayed on the right (the blue circle).
Next, Create Your Quiz with Quizmaker
Just as you started in PowerPoint, went to the Articulate tab to use Presenter, and used Engage to add your Media Player interaction into your presentation, the next step is going to start at PowerPoint/Presenter, and then you’ll use Quizmaker to add a Quiz into your Presentation.
Because the process is somewhat similar, we’re going to keep things a little more high level than we did when we explained how to add an Engage interaction above. But remember, Articulate’s got you covered with tutorials on their website. Here’s where you can learn every last detail about creating a quiz in their Quizmaker.
So, here are a few starter steps.
1. In PowerPoint, with the Articulate Menu open, look in the slide outline view on the left and click on the slide that you want to appear immediately before your quiz (if you look at our screen grab below, you’ll see we’ve picked a slide one below the Engage Interaction–that slide will be a short one telling the employee that a quiz is coming next).
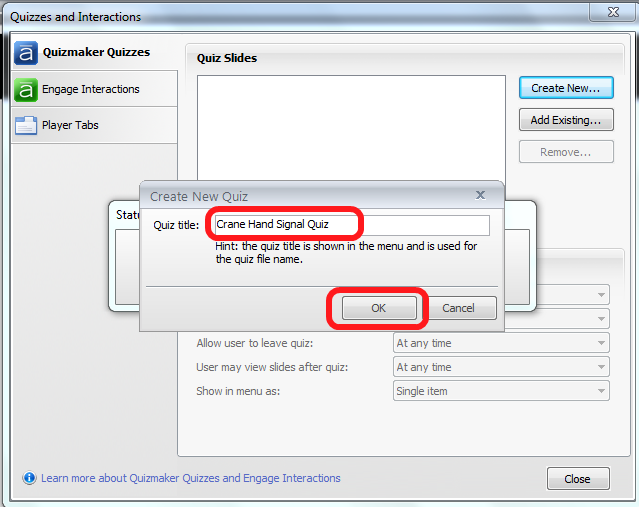
2. When the next window opens, it will ask if you want to create a new quiz or add an existing one. Click the Create New Quiz button.
3. Name your new quiz and click OK.
Select the screen that you want you quiz to appear AFTER and then click the Quiz button on top.
Click the Create a New Quiz button.

Give the quiz a name and click the OK button.
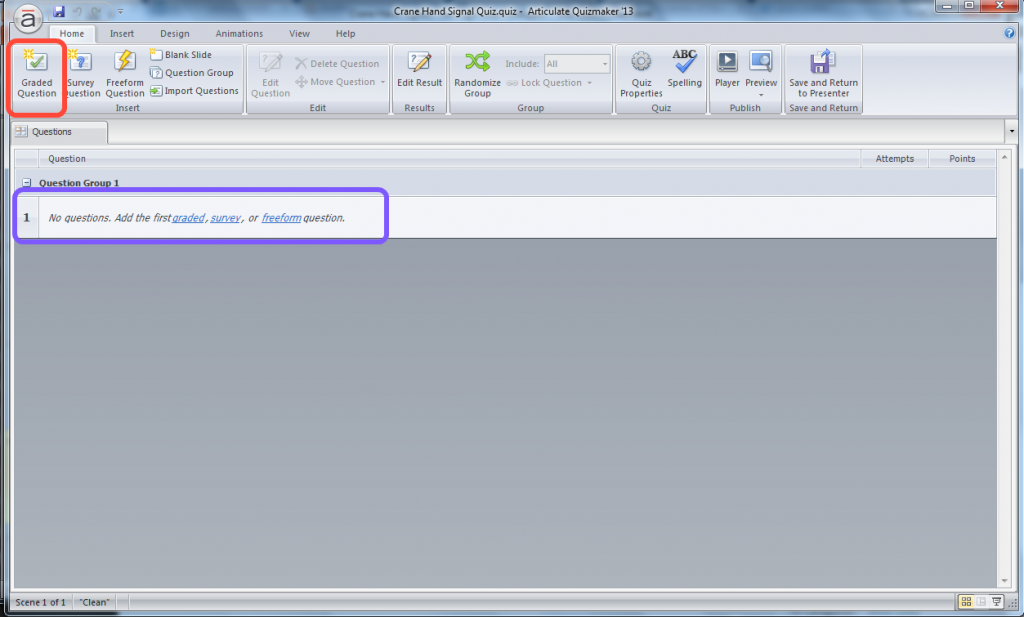
OK, now the Quizmaker will be open (see below). There will be no questions yet (see the blue circle below), but that’s what you’ll do next.
You’ll be given an option to add questions from three larger “question types”–graded, survey, or freeform. In most cases, especially as a beginner, you’ll select a “graded” question. Again, I won’t go into great detail here, but you can find more information about these question types at Articulate’s website.
Once you’ve chosen to add a “graded” question, it will ask you the specific type of graded question you want to add. You’ve got a bunch of options, as you can see below:
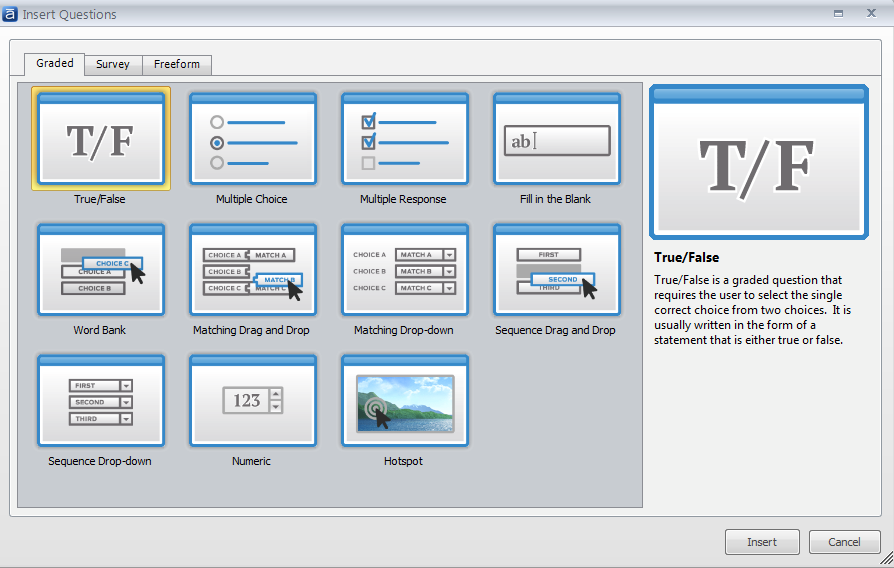
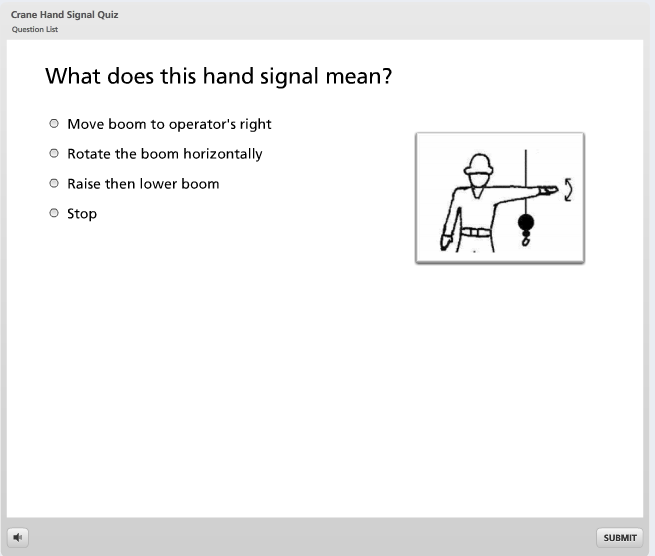
For this demonstration, I’m going to select Multiple Choice.
Once I’ve made my selection, I’m put on a screen where I can build my first question. Below are two screen grabs–the screen before I created the question, and the same screen after I created the question.
Here’s the screen before:
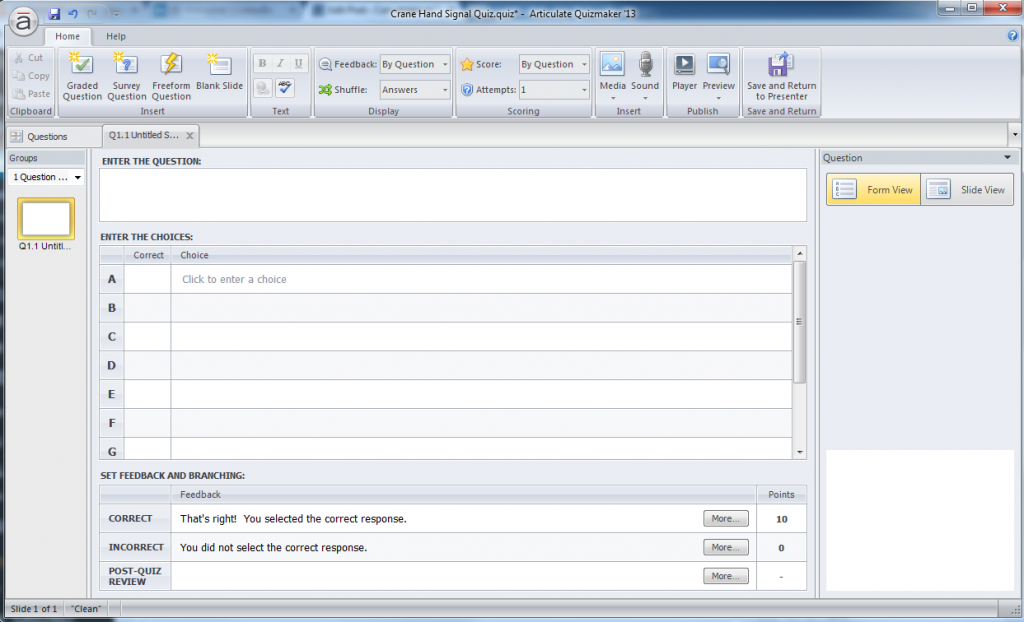
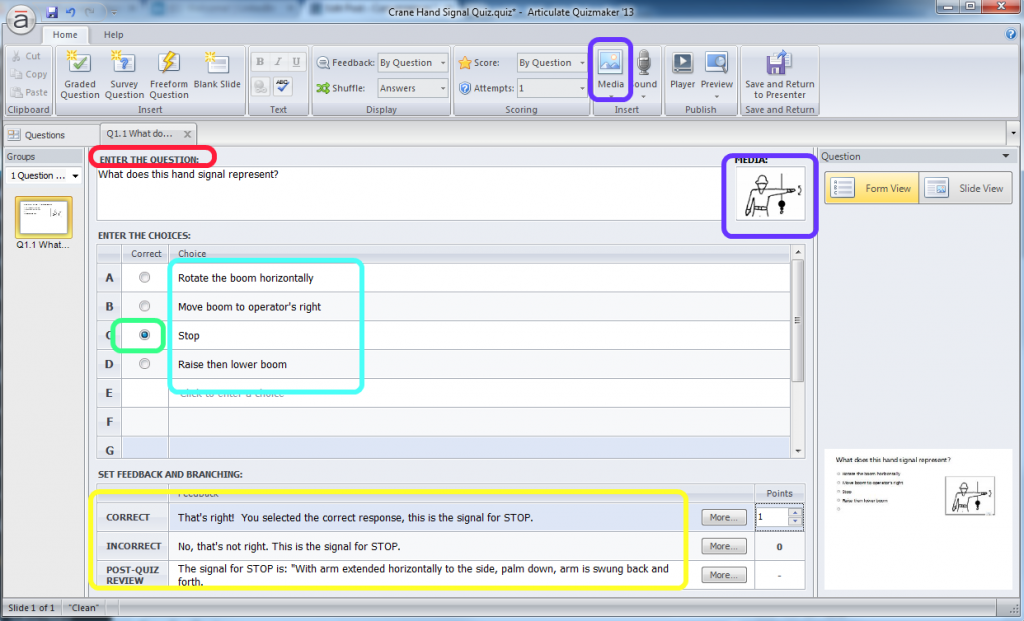
And below is what the screen looks like after the question is created. Check out the following things:
1. I wrote the question stem in the space the red circle is.
2. I added the image the question refers to by clicking the Media button-see the two blue circles.
3. I added the possible answer choices for this question where the light blue square is.
4. I clicked in the radio button next to the correct answer–see the green box.
5. I overwrote the default feedback for people who answered the question correctly and/or incorrectly, putting my own question-specific feedback in, and then I added a sentence for the post-question review–see the yellow box.
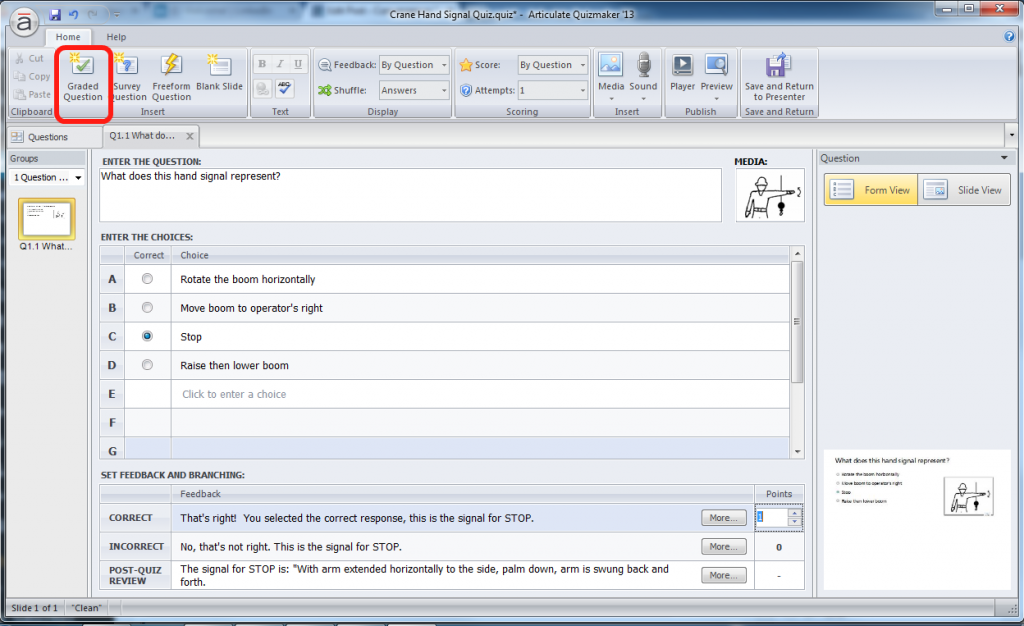
Once you’ve created one question in your quiz, click the Graded Question button in the toolbar on top (the red circle, below) to begin creating another. Do this repeatedly, once for each question. As we said before–rinse, lather, and repeat 🙂
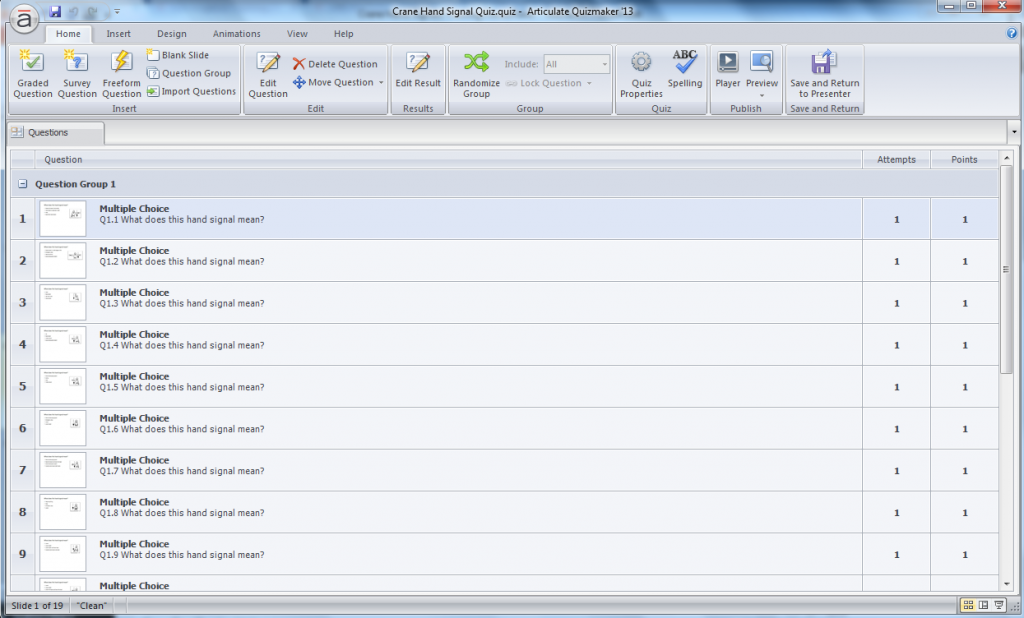
Eventually, you’ll have a list of questions like the one shown below.
Select Some Quiz Settings (Randomize Questions, Passing Score, Etc.)
Once you’ve got your questions the way you like them, you can make select some settings to have the questions appear in random order, set the passing score, and so on. Without showing you ever step, I’ll show you some of the options and where to find them below.
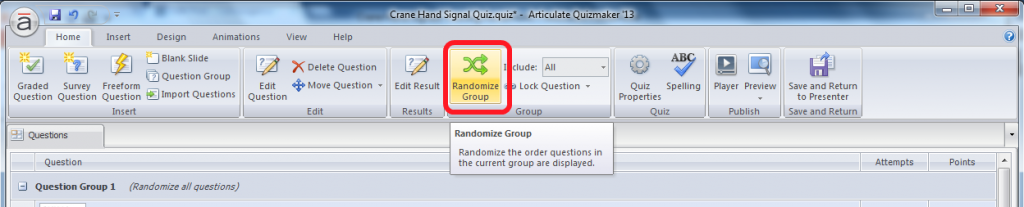
Have Your Questions Appear in Random Order
Just click the “Randomize Group” button in the toolbar if you want the questions in your quiz to appear to each learner in random order (see below).
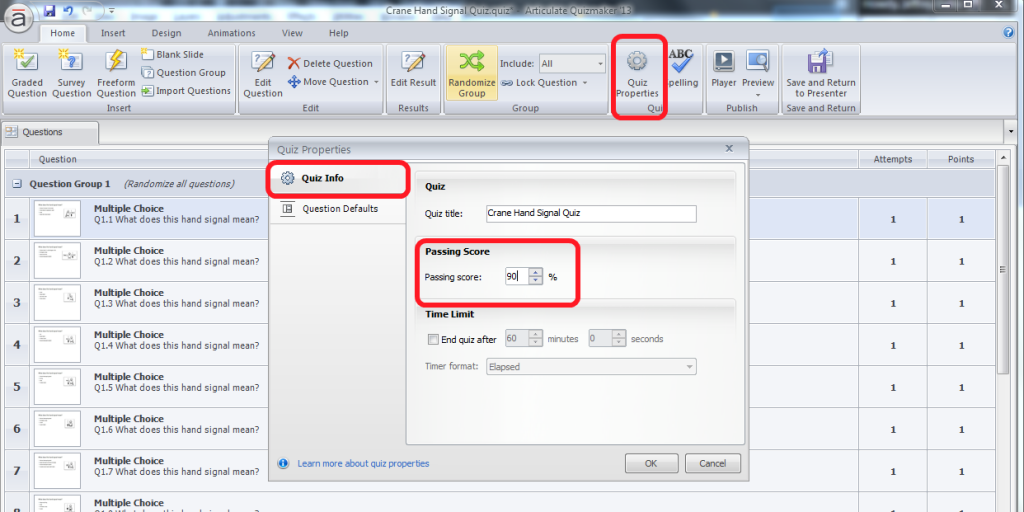
Set the Passing Score for Your Quiz
To set the passing score for your quiz, click the “Quiz Properties” button in the toolbar, then the “Quiz Info” tab in the Quiz Properties window, and then select the passing score.
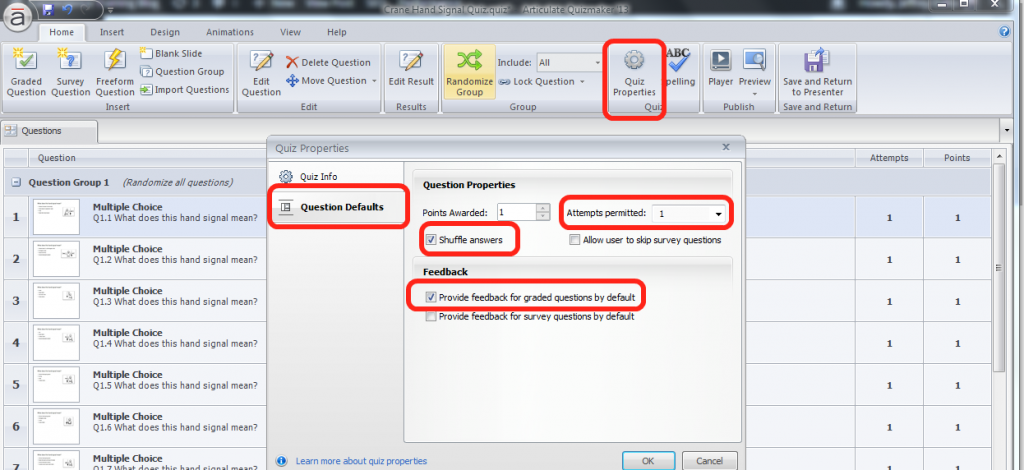
Set Additional Quiz Properties
You can also set other quiz properties.
Below, we’ve chosen to have the answer choices for every question appear in random order, to allow the learner only one attempt to answer each question, and to have the feedback be presented to the learner after each question.
Next, Preview Your Quiz
Once you’ve got all your questions written, it’s a good idea to preview your quiz to make sure it looks right before you close Quizmaker (although it’s easy enough to go back and edit later if you need to).
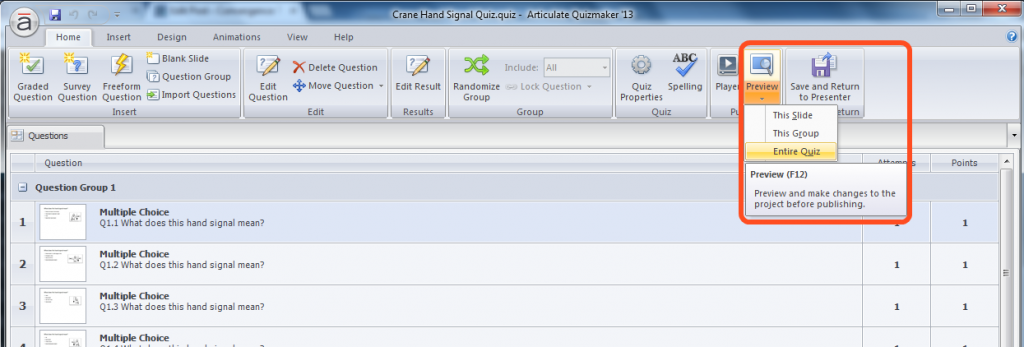
Your quiz will look something like this:
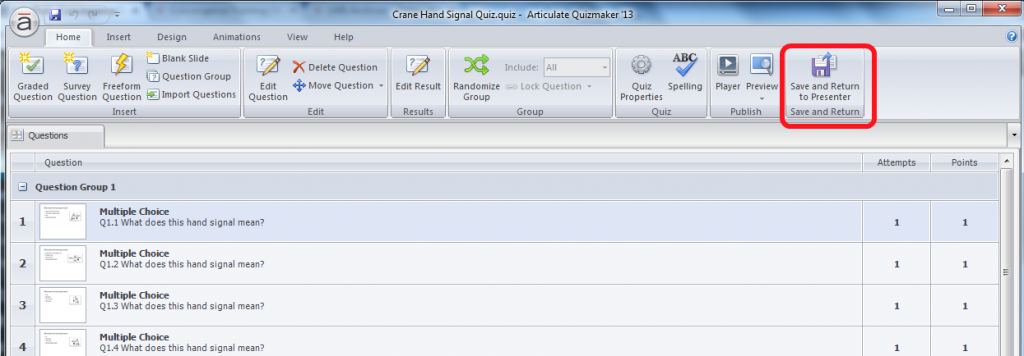
Save the Quiz and Return to PowerPoint/Presenter
Next, click the “Save and Return to Presenter” button in the toolbar (first image below, red circle) and your quiz will be saved and closed, Quizmaker will close, and you’ll be returned to PowerPoint/Articulate Presenter.
When you return to your PowerPoint, you’ll see there’s one slide that acts as a placeholder for your quiz.

Next Step: Finish Up Your PowerPoint
Once you’ve got your Interaction (created with Articulate Engage, as demonstrated above) and your Quiz (created with Articulate Quizmaker, as also demonstrated above) created and inserted into your PowerPoint, do whatever else you might need to do to complete your Presentation.
If these are helpful, you might want to check out some of these other posts on our blog at this point:
- How to write training materials
- How to write learning objectives
- Tips for creating visuals within your training materials
Save Your File and Publish Your Presentation
Next, you’ll want to save your file and then publish your presentation in a format appropriate for a learning management system–most likely, SCORM.
We’ll show you how to do that in just a bit, but first, let’s explain what a learning management system (LMS) and SCORM are. If you already know what they are, just skip this next section, which we’ve indented for maximum “skippability.”
Learning Management System (LMS): An online software system that allows you to import, assign, deliver, track, and report on training. We are assuming that you’ll want to publish your e-learning course into a format that you can later import into an LMS, and the publishing instructions below are based on that assumption. You can, however, publish in other formats. See Articulate’s website for more information about this.
SCORM: In non-technical terms, SCORM is a format that e-learning courses are saved in so that they can then be imported into, and work well with, SCORM-compliant learning management systems.
OK, with that down, let’s turn to publishing.
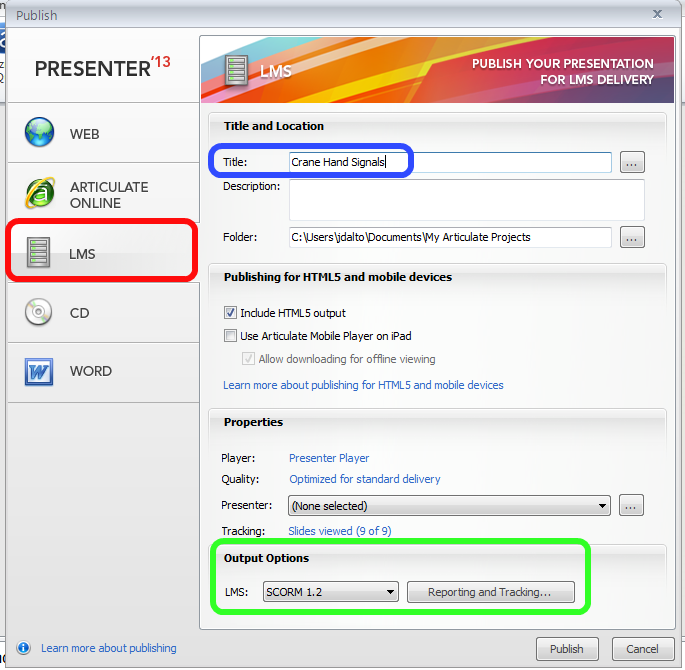
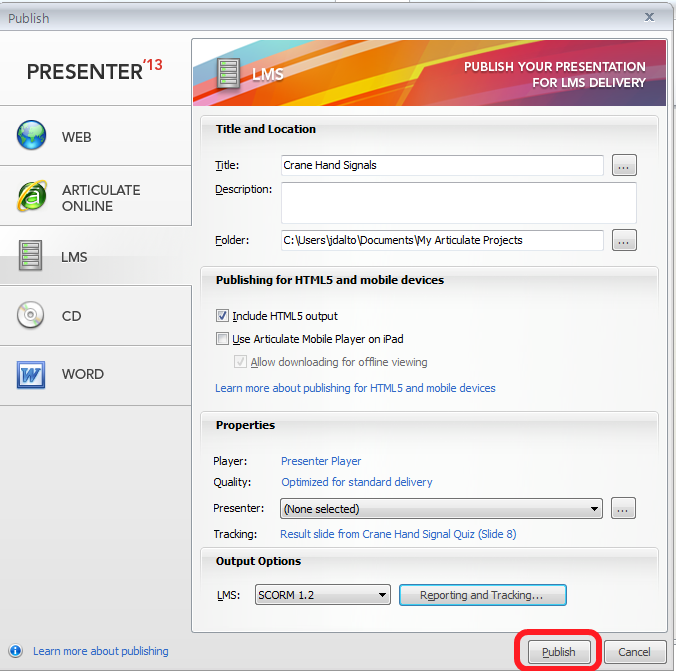
First, as we said earlier, save your PowerPoint presentation as you normally would. Next, in the “Articulate” menu, click the “Publish” button (see below).

The Publish window will open. Once there:
1. Click the LMS button (so you can publish in SCORM format and later import this into your LMS). This is circled in red, below.
2. Name your course (this is circled in blue below).
3. Prepare to select some settings in the Output Options section (this is circled in green below). We will explain these more in just a little bit.
At the bottom of the Publish window, there were two places where you could make selections for “Output Options.”
In the first, choose SCORM 1.2. This is the default selection (meaning they’ve already chosen it for you), so that won’t be hard. There are other options, and you can read more about those at Articulate’s website.

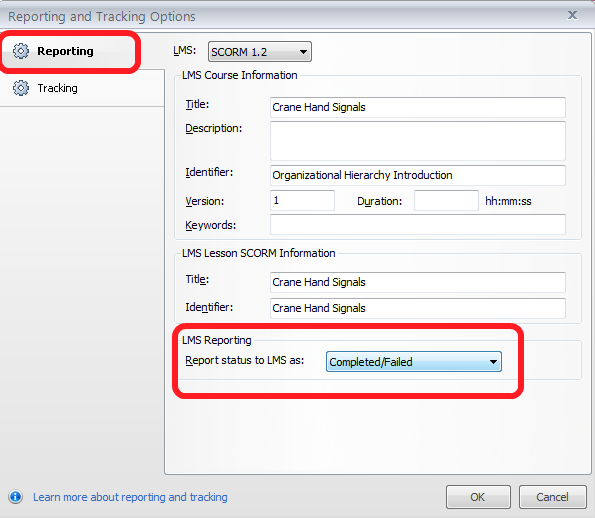
Next, let’s talk about the “Reporting and Tracking” options. Begin by clicking that button.
There are a number of settings you can make on the Reporting and Tracking Options window (see below). We won’t cover all of them, because they’re covered well on Articulate’s website. However, we do want to call your attention to the following ones.
Reporting Options:
In the “Report Status to LMS” section, make a section that’s appropriate for your LMS and your needs. When working with a Convergence Training LMS [that’s our assumption here, and if you’re not, why aren’t you? :)], select one of the options that DOESN”T end with “incomplete.”
Tracking Options:
In the Tracking Options tab, you’ll make selections that tell your LMS how to “track” the completion status of your workers when they later view and attempt to complete this course within your LMS.
You can see below there are two basic options for tracking completion:
Track by the number of slides/screens your employees view
Track by the quiz (remember, when you created the quiz you set the passing score for that quiz)
Both options can make sense in different circumstances. In this case, we want our LMS to track completion by the quiz, meaning the employees will only be considered complete if they pass the quiz that’s part of our presentation (that’s the quiz we created above, and for which we set a passing score of 90%).
Once you’ve made your Tracking and Reporting selections, click the “OK” button at the bottom-right corner of the window to return to the Publish window.
Next, click the Publish button (see below).
After Articulate Studio chews on that “publish” command for a while, it will display a “Congratulations” screen like the one below.
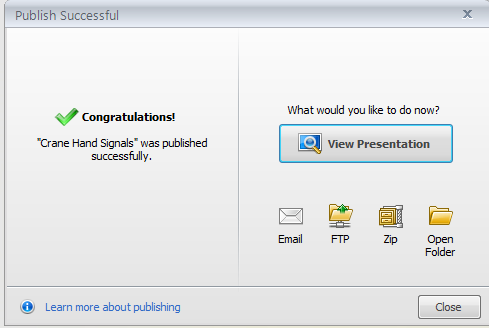
But don’t forget that you still need to ZIP up the materials Articulate just created. To do that, just click the Zip button.

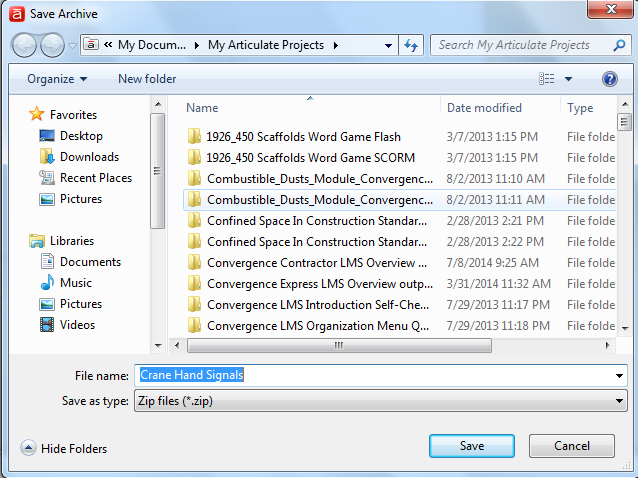
You’ll be asked where you want to save the .zip folder on your computer, as below.
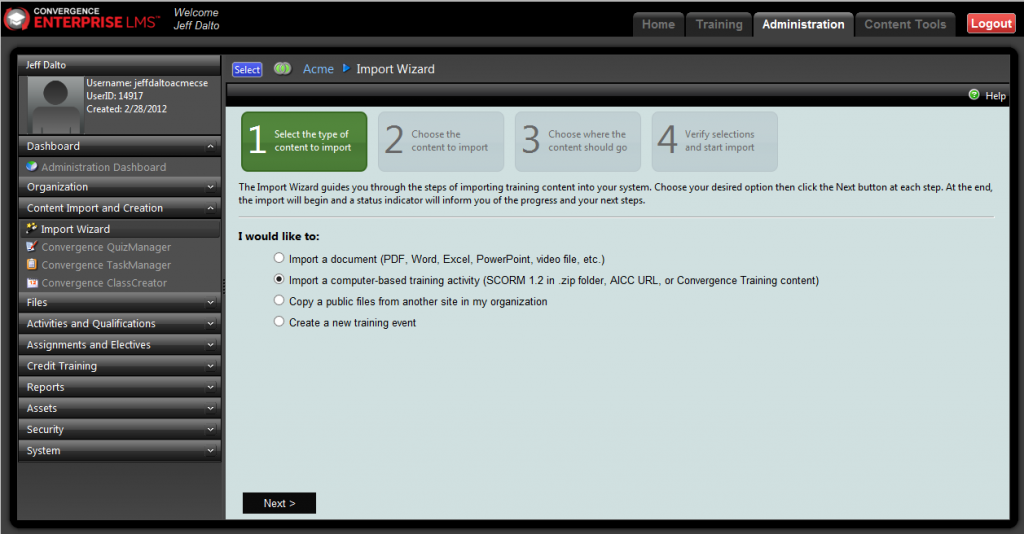
Finally, Import It Into Your LMS (And Assign it To Your Workers, Etc.)
Once your .zip folder has been saved to your computer, you’ll want to import it into your learning management system (LMS) so you can later assign it to your workers and they can complete it.
This will work a little differently in different LMSs. In the LMSs created by Convergence Training, it’s as simple as following a few steps in our Import Wizard.
If you’d like to know more about learning management systems (LMSs), here’s a quick overview video.
If you don’t have a learning management system, check out these LMSs from Convergence Training or contact us to set up a demo:
Or, you can also check out our free LMS Buyer’s Guide or learn how an LMS can help with safety training.
OK, Here’s What Your Self-Created e-Learning Course on Crane Hand Signals Would Look Like
So, that’s all there is to it.
Check out the hand signals course we just created.
Remember, we’ve kept this very short and simple because our main goal was to teach you to do four things in Articulate Studio ’13:
1. Create a Presentation with Articulate Presenter that was based on a PowerPoint presentation
2. Create and add an Interaction with Articulate Engage
3. Create and add a Quiz with Articulate Quizmaker
4. Publish the Presentation and prepare it for importing into an LMS
There’s still a lot more you can do with Articulate if you wanted to. For example, you could use some of their pre-formatted templates to make this look more visually attractive. Here’s the page on their website where you can find their templates. In the future, we’ll create an entirely new blog post that shows you how to work with one of their templates.
Also, Articulate has some nice stuff for you on the following tips:
- Easy ways to make nice but simple graphics (by a weird coincidence, their example deals with crane hand signals too)
- e-Learning examples from e-learning creators who have done some great work (so you can model your own work after theirs)
Hope you found that interesting and helpful. Let us know if you use this information to help you build your own e-learning course. You can find more about eLearning Authoring Tools at the following articles:
- Online Training Basics
- What is an eLearning Authoring Tool?
- Using an eLearning Authoring Tool Recorded On-Demand Webinar
- Choosing & Using an eLearning Authoring Tool
And feel free to download our free Guide to Effective EHS Training below, too.
Effective EHS Training: A Step-by-Step Guide
Learn how to design, create, deliver, and evaluate effective EHS training by following these best practices with our free step-by-step guide.
Thank you!! I have just started to use Articulate and found this tutorial helpful and encouraging! It’s great that you have taken the time to present and offer this free step by step information.
Thank you very much Jeff for this very detailed post on how to use Articulate. I have been wanting to purchase and use Articulate for a while but did not feel confident enough to learn how by myself. Your tutorial was very informative, easy to follow, and encouraging! I now feel I have enough information and guidance to be able to start using Articulate myself. I can also reference your tutorial again if needed. Thanks again for taking the time to write this article and webinar!
Amy, glad to hear you found this helpful.
Honestly, I remember being intimidated the first time I had to use an e-learning authoring tool as well. But they’re quite easy to use once you figure a thing or two out, huh?
Jeff.
More than thank you, it’s not just helpful, it’s real a guide to learn step by step. I Wounder if i can translate it to Arabic and used it for training.
Thanks, Kareem, glad you found some value.
I’m sure you know that Google has a free translation service, and are looking for something different/possibly better…good luck.